Erin Cook - Architectural Design ll
Project 01 - Olympic Team Training Dorm
The design objective was to create three different concept designs for a Winter Olympic sport of my choice near where that sport trains. It needed to be able to house both the women and men's teams, along with any staff like coaches that would come with them. The building concepts also had reflect the athletes that will reside within it along with the sport they compete in.
Research
Olympic Sport - Alpine Skiing
We started with exploring our chosen sport through the use of pictograms. The drawing on the left is the Alpine Skiing pictogram from the 2022 Beijing Winter Olympic Games. The second drawing is of the gates the athletes are required to pass through as they compete, and the third drawing is of the path they take down the mountain as they swerve to pass through the gates. The fourth and fifth drawings are of positions the athletes take to speed down to the finish line, but the fifth drawing is abstracted to find the basic shapes they take as they bend over to get more speed. The final drawing is a representation of an alpine skiing athlete speeding up as they head down the mountain.
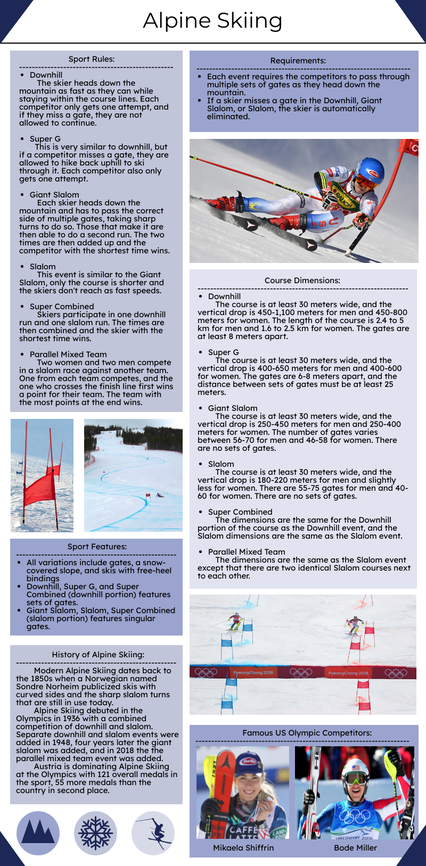
Alpine Skiing Infographic
|
While were were exploring our sport in pictograms, we were required to do in-depth research of our chosen sport.
Alpine skiing was the chosen Olympic sport, as it is one of the more interesting sports to watch during the Olympic Games. There are different events the athletes can compete in for alpine skiing, but the main concept is the same: get down to the bottom as fast as possible without missing any of the gates. Speed is the main focus of this sport. Many athletes will actually hit the edge of the gates to get down to the finish line faster. |
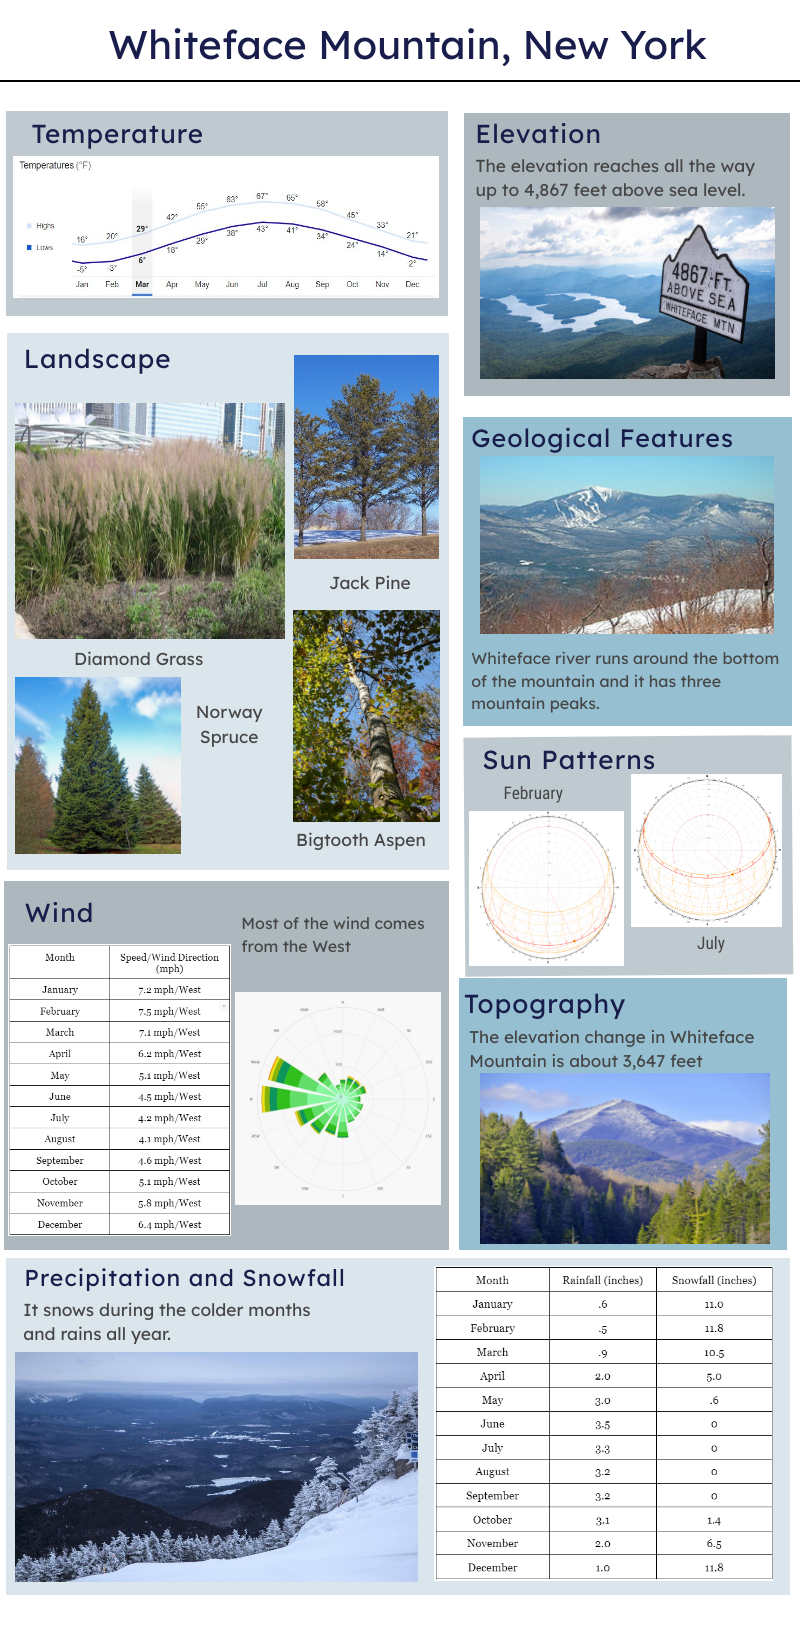
Site Infographic
|
As we were doing research about our sport, we had to find out where our athletes practice for the Olympics and do research about the site or training facility.
Whiteface Mountain is site for this project. It is one of the Olympic training sites for the United States' alpine skiing team. Whiteface Mountain is located in New York, about 7 miles away from Lake Placid, another Olympic training site. On Whiteface Mountain the wind normally comes from the west at Lake Placid, and the temperature ranges from -5° Fahrenheit during the winter months, all the way up to 67° Fahrenheit in the summer months. |
Site Analysis
|
|
After researching our site location as a whole, we had to choose a specific site within walking distance of the training facility.
To represent Alpine Skiing correctly, the site had to be either near the base of the mountain the athletes train on, or on the side of it. It sits about a fourth of the way to the top and within skiing distance of a ski lift which would take the athletes to the top where they can then ski down for practice. The main access to the site is from the top, where the athletes can easily ski into it, or they can ski through the site and exit out of the bottom to reach the ski lift. |
Concept Designs
After figuring out our specific site, it was time to come up with three different concept designs. It was important that they were all visibly different, but that they all represented some aspect of the sport we chose to make the designs for.
Concept One
|
For the first concept design, the emphasis was on how fast these alpine skiers go when racing for the gold medal, as well as how their skis are pointed when they speed down the mountain.
The dual structures are elongated to represent how the athletes speed up as they rush down the mountain and to be semi-parallel to mimic what their skis look like with a small twist so it isn't perfectly symmetrical. There is also a space between the structures where the athletes can ski through the building to physically incorporate the sport into the design. |
|
Concept Two
|
|
The second concept design also focuses on the speed of the athletes, albeit in a slightly different way then the first concept explored it.
This design is taller than the first concept to focus more on the height of the mountains the alpine skiing athletes race on. The diagonal rectangles are meant to represent skis and double as a showing speeding up as the skiers head down the mountain, or the building. The windows are diagonal to further drive home how fast these athletes go. |
Concept Three
|
For the third design, the focus was on speed as well as a different aspect of the sport: the path the athletes take down the mountain in an abstracted way.
In alpine skiing the competitors zig-zag to the finish line to pass through all the gates and not get eliminated if they miss one. To emulate this, the different levels of the building face opposing ways to represent the path as well as making the building wider and longer as it gets to the bottom to show speed. The triangular details on the middle piece are also meant to represent speed. |
|
Final Design
As it came time to create our final designs, we had to pick which concept we wanted to explore in more detail. The concept that eventually won was concept one. A SketchUp model was made with the chosen concept and adjusted to better fit the site and take critiques into consideration.
Building Programming
|
The first thing we did after selecting which concept to go with was to create a building program. This was required to have dorm rooms for the athletes, a gym, a cafeteria, etcetera.
This programing was then color-coded and added to our SketchUp models so we could easily understand where everything was expected to go. After color-coding our model, we had to place it on our site and make adjustments so it would fit better, hence the white parts at the base of the building. |
|
Single Line Drawings
|
|
The second thing we did with our chosen concepts was to create simple single line floor plans for our buildings alongside the building programming.
The program was used to figure how much space everything would need, and translated into simple floor plans. This was a crucial step as it was a starting point and gave content to make creating the Revit model easier. |
Schematic Design Development
|
After figuring out how our interiors would work, it was time to figure out the exteriors. We explored this by using our single line drawings and making elevations based off them, adding something we hadn't thought of before like exterior materials or landscape.
The building sits on the side of Whiteface Mountain, so the topography and landscaping were important elements to incorporate into these drawings. As a bonus, exterior materials were thought about, wood siding and concrete, and where they would be located on each side of the building. The alternating wood and concrete in meant to give each building a sense of unity without them being exactly the same. |
|
Study Model
|
|
With an idea of what the exterior would look like, it was time to create a site model. This was laser cut to be as accurate as possible, and then we had to create a study model which would explore an aspect of our buildings we hadn't yet explored.
This model was created to give a 3D representation of where it would sit on the actual site to give an idea of what type of windows would work where and what interior spaces had to be changed to reflected this. The study model is a physical fabrication of the elevation drawings with a few minor tweaks to make it flow better. It was then glued onto the site model, which it has since been cut out of to make space for the final model. |
Revit Model - Floor Plans and Elevations
After the study models we were tasked with creating a Revit model. This was to be a lot more complex than our previous SketchUp model as it needed to have everything in it from walls and doors to toilets and sinks.
This model is the single line drawings and elevations drawn into Revit with an additional level of detail. Somethings have been moved around, for example one of the gym floors became a dorm floor to house additional athletes, and everything has an extra layer of detail as opposed to the single line drawings.
This was one of the most time consuming portions of this entire project alongside making the final model.
|
|
|
Revit Model - 3D Images
|
The Revit model was also used to get scaled images of our buildings' exteriors, as well as get pictures of what someone might see if they were actually inside our buildings.
Most of the images to the right are of the building's exterior, but the final two pictures are of the interior. The fifth image is of a single dorm room, and the sixth picture is of the gym area, which overlooks the mountain side. The final image is of the public cafeteria. |
|
Final Model
|
|
As we made the Revit model, we were also tasked with creating a final, physical model. This was to be based on the Revit model and include every wall, window, and door that would fit at 1/16"=1'-0" or 1/8"=1'-0". The model shown to the left is at 1/16" scale.
The final model is made out of chipboard, for the interiors and exteriors, and the glass bridge going across is made out of plastic. Overall the model took about two weeks to finish alongside the Revit model, so it was a complicated endeavor. The verticals lines on the exterior are meant to represent wooden planks, and the blank walls are to be made out of concrete. |


